

A homeowner replaces one cherry cabinet door after a small accident. The new door looks pale and pink. The cabinets beside it are a deep red-brown. Nothing is wrong with the new door. It simply has not aged yet.
This happens in homes all the time. Wood is a natural material. It reacts to light, air, heat and moisture. Over months and years, its color shifts. Some woods darken. Some fade. Some turn golden. The finish on top changes too.
That shift is not a defect. Many people love the warm patina that real wood develops. Problems start when the change comes as a surprise. A tabletop that fades in a sunny patch looks odd. A new door that clashes with old ones looks like a mistake.
This guide explains why wood changes color over time. You will see how white oak, black walnut, hard maple and cherry respond to light. You will also see how oil, water-based and solvent-based finishes age, how to test samples before you commit, and how to care for woodwork so the color change looks planned. No finish stops every change. The goal is to know what to expect and choose with open eyes.
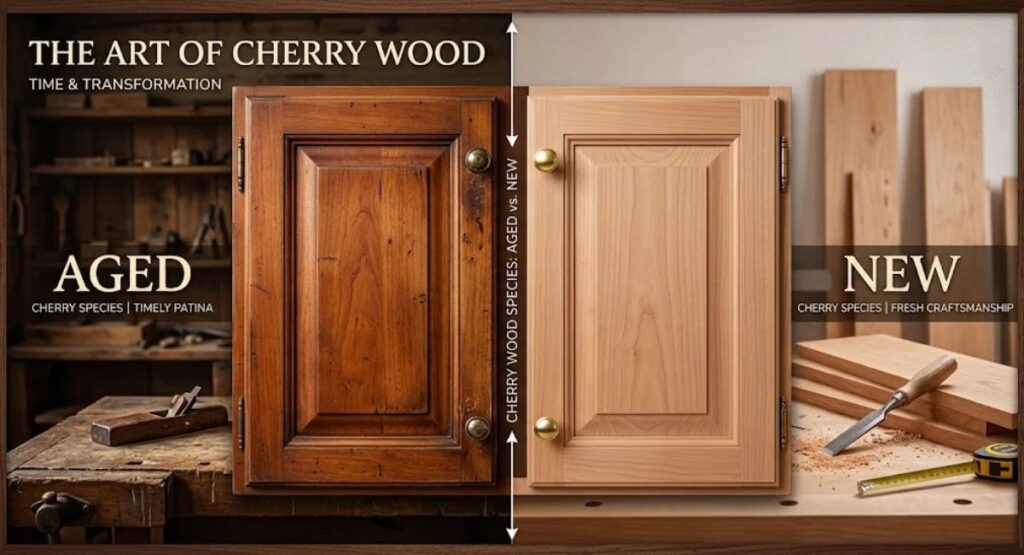
Why Does Wood Change Color?
Wood changes color because light and air react with the chemicals inside it. The finish on top also ages. Together, these changes shift the look of wood over time.
The main causes are:
- Light: Ultraviolet (UV) and visible light break down lignin, a natural compound that gives wood its structure and color.
- Oxidation: Oxygen reacts with extractives, which are natural color-bearing compounds such as tannins.
- Heat, moisture and metal: These can speed up or alter color change, and metal contact can cause dark stains in some species.
- Finish aging: Many clear coats amber slightly over time, which adds warmth.
Species matter. White oak and cherry usually darken. Black walnut often lightens. Hard maple tends to turn creamy or golden. Exposure matters too. A cabinet near a bright window will change faster than one in a shaded corner.
The science behind wood discoloration
Color change in wood is a chemical process. Knowing how it works helps you predict it.
Light and lignin
Wood is made mostly of cellulose, hemicellulose and lignin. Lignin absorbs light, including UV light. That absorption breaks lignin’s chemical bonds. The result is a shift in color. Visible light plays a role too, not only UV. This is why wood still changes behind glass, which blocks much UV but not all visible light.
Oxidation of extractives
Extractives are small compounds in the wood that give each species its tone. Tannins are one group. When extractives meet oxygen, they oxidize. Oxidation often darkens wood. It can also shift hue toward red, brown or gold. This is why some woods deepen even in low light.
Moisture, heat and metals
Moisture and warmth speed up many chemical reactions. Wet wood can also grow dark mineral stains. In species high in tannins, such as oak, contact with iron and water can leave blue-black marks. A wet steel pad or a rusty nail can cause this. It is not a finish failure. It is a reaction between the wood and the metal.
A surface effect
Most light-driven change happens in a very thin outer layer of the wood. Light does not travel deep. That is why a sanded surface can look fresh again. Sanding removes the changed layer and exposes new wood. The new surface will begin to change, too.
Timing
Change is often fastest in the first weeks and months. It then slows. After a year or two, many woods settle into a steadier tone, although slow shifts can continue for years. Sun exposure, finish type and species all affect this timeline.
The USDA Forest Products Laboratory publishes the Wood Handbook, a respected reference on wood properties, weathering and finishing. It is a good source for readers who want deeper technical detail.
How white oak, walnut, maple and cherry change over time
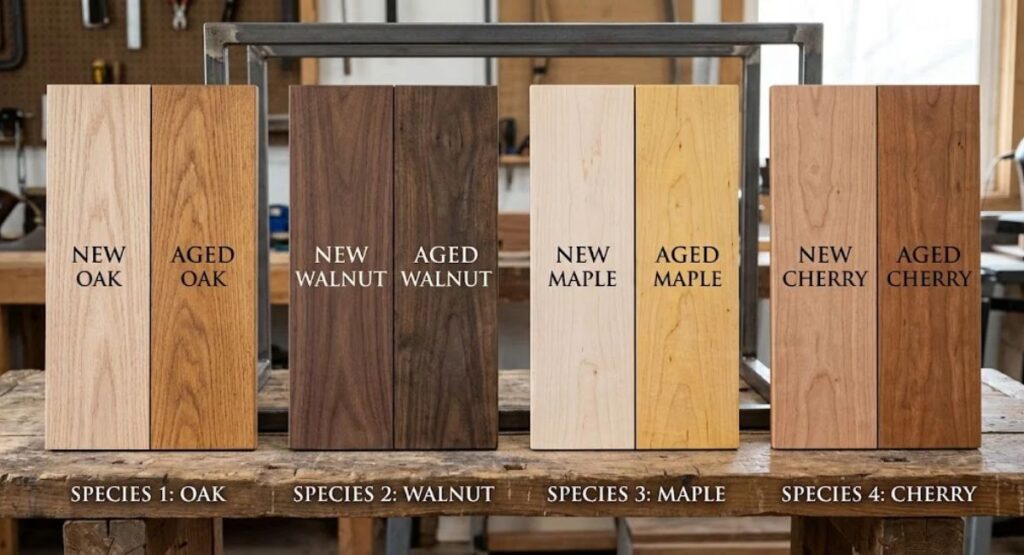
Every species has its own habits. The table shows common tendencies. Results vary by board, finish and light exposure.
| Species | Typical starting color | Typical change | Notes |
| White oak | Light tan to light brown, often with gray or olive hints | Warms and darkens toward golden or amber brown | High in tannins, reacts with iron |
| Black walnut | Chocolate to purple-brown, often with gray tones | Often lightens and shifts toward golden or gray-brown | Deep tone lasts longer in low light |
| Hard maple | Creamy white to pale tan | Slowly turns creamier, yellower or more golden | Finish type has a big effect |
| Cherry | Light pink to light red-brown | Darkens to a deep red-brown | Most change comes in the first year |
Why white oak darkens over time
White oak holds plenty of tannins. Light and air act on them, and the wood warms from pale tan to a richer golden brown. The change is gradual and often pleasing. White oak also reacts to iron, so keep steel wool and wet metal tools away from bare or lightly finished surfaces. Oil finishes tend to deepen the tone from day one. Water-based finishes stay cooler and clearer at first.
Black walnut
Walnut starts dark and rich. Strong light often lightens it. Over time, the purple-brown heartwood can shift toward a lighter, more golden or gray-brown color. Mills sometimes steam walnut to even out the color between heartwood and sapwood. Protecting walnut from direct sun helps the deep tone last longer.
Hard maple
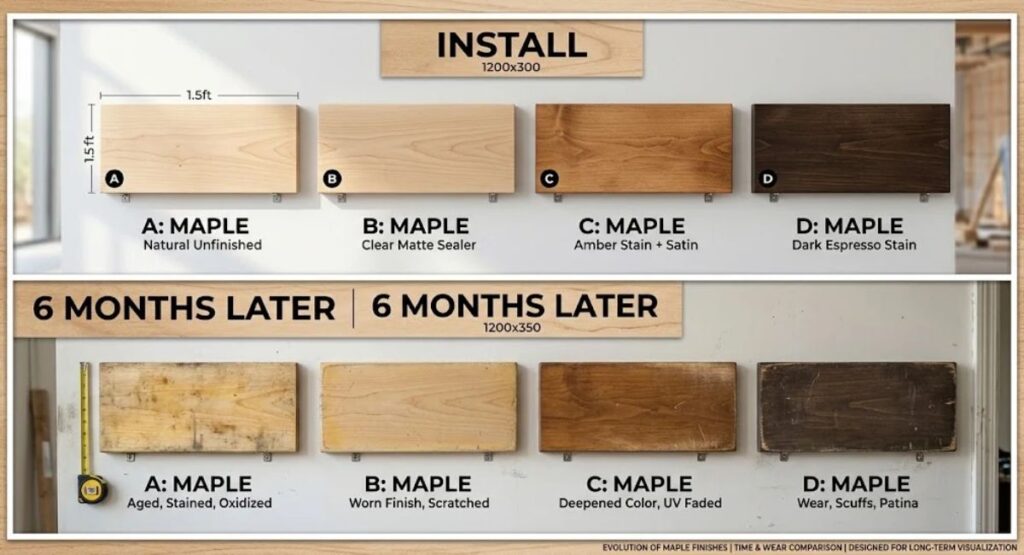
Maple begins pale and clean. With time, it often shifts toward cream and soft gold. It changes less than cherry or oak, but a pale tone makes subtle shifts easy to notice. Finish choice matters here. Oil-based coatings add amber right away. Water-based coatings keep maple lighter.
Cherry
Cherry is the classic example of a wood that darkens. A new cherry cabinet can look light pink or tan. Within months, it moves toward red-brown. Over a few years, it can become deep and rich. Light speeds this up. A cabinet beside a bright window will darken faster than one in shade.
How sunlight changes wood finishes
Sunlight is the biggest driver of visible color change. It acts on both the wood and the finish.
Direct light and indirect light
Direct sun changes color fastest. Bright, indirect daylight still has an effect. A cabinet beside a south-facing window will shift sooner than one on a shaded wall. Even interior light has a small effect over long periods, although it is much weaker than sun.
Glass does not stop it
Window glass blocks much UV. It does not block visible light. Since visible light also alters wood, a sunlit surface behind glass will still change. UV-filtering window film can slow the process. It does not stop it.
Uneven change and ghosting
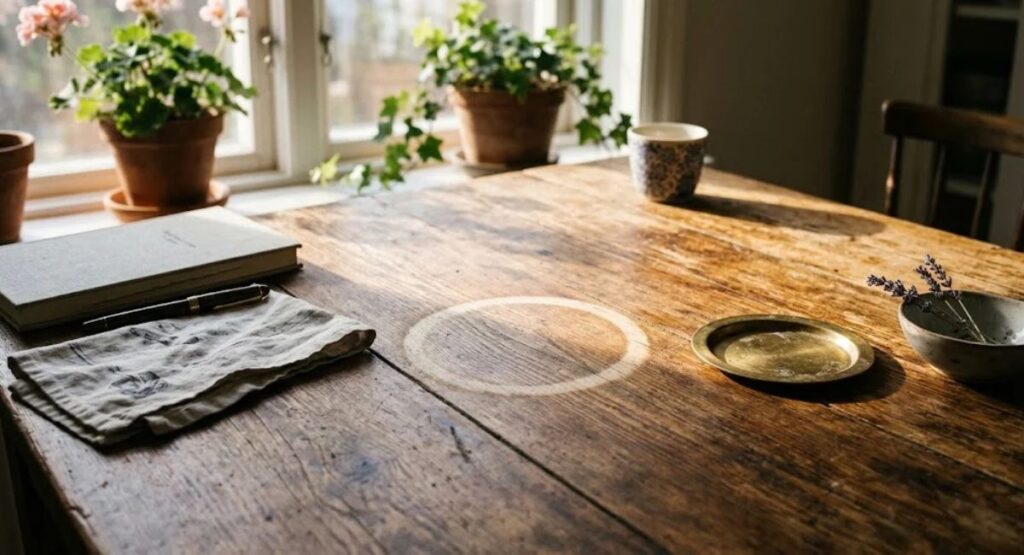
Change is uneven when light is uneven. A fruit bowl, a vase or a stack of books can shield part of a surface. When you move the object, a lighter or darker patch remains. Designers call this ghosting. It is common on tabletops, windowsills and countertops near windows. Rotating items and rearranging now and then reduces the effect.
Stains and dyes
Color in the finish layer can fade too. Dye-based stains tend to fade faster than pigment-based stains. Pigments are more lightfast. If a project will sit in strong light, ask your maker which type of color they use.
Ways to slow the shift
You can reduce the speed of change. You cannot remove it. These steps help:
- Use curtains, blinds or UV-filtering film on windows
- Choose a finish that includes UV absorbers
- Rotate decor and keep surfaces from being covered in one spot for months
- Keep sensitive species, such as cherry or walnut, out of the brightest spots when possible
No clear coat, including those with UV protection, can promise to prevent all color change. Treat UV-resistant finishes as a way to slow the shift.
How different finishes age on hardwood
The finish is the first thing light and hands meet. It shapes the starting color and how the wood ages beneath it. The table compares common finish types. Products differ, so check each manufacturer’s data sheet.
| Finish type | Look at first | How it tends to age | Care and repair |
| Penetrating oil (linseed, tung, hardwax oil) | Warm, natural, deeper grain | Ambers and deepens, wears at high-touch spots | Easy spot repair and recoating, less stain and water protection |
| Water-based clear coat | Clear, cooler, lighter | Stays clearer, while the wood beneath still shifts | Durable and low odor, may look flat on dark woods at first |
| Oil-based varnish or polyurethane | Warm amber | Yellows further with age, most visible on pale woods | Durable, harder to spot repair |
| Pre-catalyzed lacquer or conversion varnish | Clear to slightly warm | Slight ambering over time | Applied in a shop, refinishing is the usual repair |
Oil finishes
Oil soaks into the wood. It enriches the grain and gives a warm, natural look. Oil often deepens color on day one. Over time, it can amber a little more. Oil gives a soft, low-sheen surface. It offers less protection against spills and stains than a film finish. The upside is easy repair. A worn spot can often be cleaned and recoated without refinishing the whole piece.
Water-based finishes
Water-based clear coats dry clear. They keep pale woods like maple lighter and keep white oak cooler. On cherry and walnut, they can look a little flat at first because they lack the amber warmth of oil. Many water-based products now include UV absorbers. They resist yellowing better than most solvent-based coatings. The wood below still changes with light.
Solvent-based clear coats
This group includes oil-based varnish, polyurethane, lacquer and conversion varnish. Oil-based varnish and polyurethane add visible amber, and the amber grows with age. That warmth suits cherry and walnut. It can look heavy on maple. Lacquer and conversion varnish are used in many cabinet shops. They offer strong film durability, and they amber slightly with age. They are applied in controlled conditions and are repaired by refinishing.
Film finish or penetrating finish
A film finish sits on top of the wood and protects it. A penetrating finish soaks in and leaves a thinner layer. Film finishes handle kitchens and baths better. Penetrating finishes suit pieces that benefit from easy touch-ups, such as tabletops and built-in shelves. Ask your maker which fits each room.
Choosing a finish by species and room
No pairing guarantees a result. These pairings show how experienced makers think.
By species
Maple: A water-based clear coat keeps the wood pale. An oil-based coat adds amber right away. Choose based on the tone you want.
White oak: Oil or hardwax oil gives a warm, natural look. A water-based coat keeps the wood cooler and lighter. Expect the wood to warm with time either way.
Walnut: Oil enriches the dark tone. A finish with UV absorbers helps slow lightening in sunny rooms.
Cherry: Plan for change. Pick the finish that looks good at install and as the wood deepens. Many cherry projects use warm clear coats that blend with the darker tone.
By room
Kitchens and baths see moisture, grease and constant touch. A durable film finish works well in these rooms. Our custom kitchen cabinetry work is built around finishes that stand up to daily use.
Living rooms and offices often have windows and more light. Built-ins here may change color faster. UV-absorbing finishes and window treatments are worth considering. See our built-in cabinets service for examples of these projects.
Statement pieces such as islands, bars and furniture-style cabinets are close to hands and eyes. Finish quality shows most on these surfaces. Our designer cabinets page covers custom looks and finish options.
Closets and pantries get little light, so color change is slow. Finish choice here depends more on wear than on appearance.
Veneer and substrate
Many cabinets use veneered panels rather than solid boards. Veneer is a thin slice of real wood. It changes color like solid wood, but it is thin, so heavy sanding for refinishing is limited. Our guide to plywood vs MDF vs particleboard cabinets explains how panel choice affects durability and finishing.
High-touch zones
Finishes wear first near pulls, edges and corners. Hardware placement affects where hands land. Our cabinet hardware placement guide shows how layout affects wear patterns.
Sample testing: how to see color change before you commit
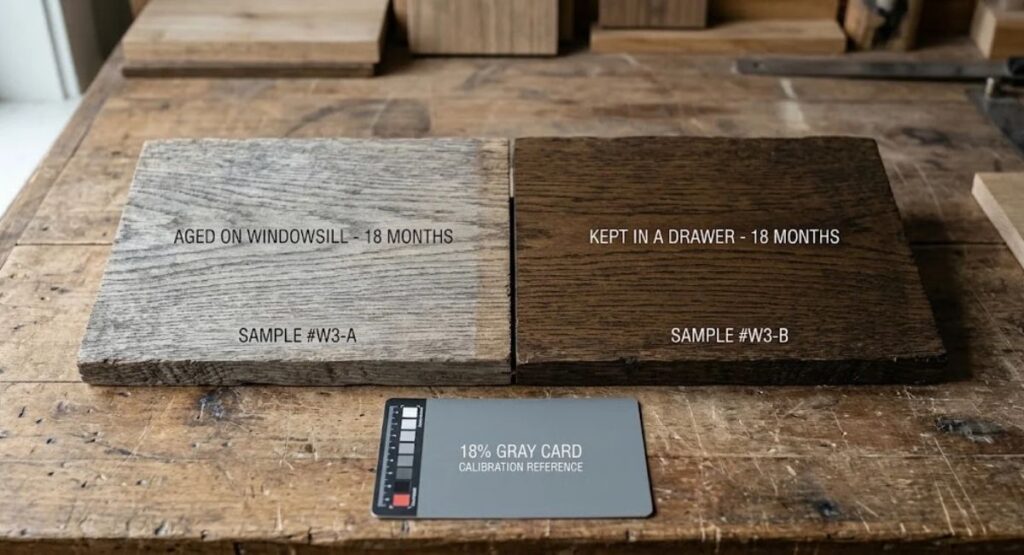
Samples teach more than any chart. A good shop keeps sample boards from past projects, some of them aged for months or years. Ask to see them. Real aged samples show how a species and finish combination behaved in daily light. Remember that each sample shows a trend for that board and that light. It does not promise the same result for yours.
You can run your own test too. Here is a simple method:
- Request matching samples. Ask for boards of the same species, cut and finish as your project. Use the exact finish product and sheen.
- Split each sample. Cut or mark each board into two halves. Label the back with species, finish and date.
- Set a control. Store one half in a dark drawer. Place the other half in the room where the woodwork will live, in normal light.
- Photograph on a schedule. Take pictures at day one, two weeks, one month, three months, six months and one year. Use the same spot, the same light and a gray or white reference card.
- Compare and note. Place the halves side by side. Record what changed, how much, and where.
Keep a simple log with these fields: species, finish and sheen, date, room, light level, and notes on color, sheen and wear. Over time, the log shows how species and finish respond to your home’s light.
Most homeowners cannot wait a year. Even a month in a window can show the early direction of change, especially for cherry and walnut. Use that early result to ask better questions, and to choose between two finishes.
Normal color variation vs real finish problems
Not every change is a defect. Some are normal. Others need attention.
Changes you can expect
Wood has natural variation. Heartwood and sapwood can differ in color. Grain, mineral streaks and board-to-board shifts create a lively look. Aging adds more. A cabinet near a window may differ from one in the shade. Horizontal surfaces such as shelves and countertops usually change faster than vertical ones. Edges and handles show wear first.
These are signs of real wood. A good maker will explain them before the job.
Signs of a finish problem
Some issues point to a finishing, moisture or care problem. Watch for these:
- Blotchy or cloudy areas that look like uneven stain
- Peeling, bubbling or cracking in the finish
- White rings or hazy spots after water contact
- Sticky or tacky surfaces on oiled wood
- Black spots near metal fasteners or wet metal items
- Raised grain or rough feel that does not settle
If you see any of these, contact the maker or finisher. Describe the issue, share photos and note when it started. Some problems come from the environment, such as a leak, and some come from the finish. A professional can help sort out which.
How to maintain natural wood color
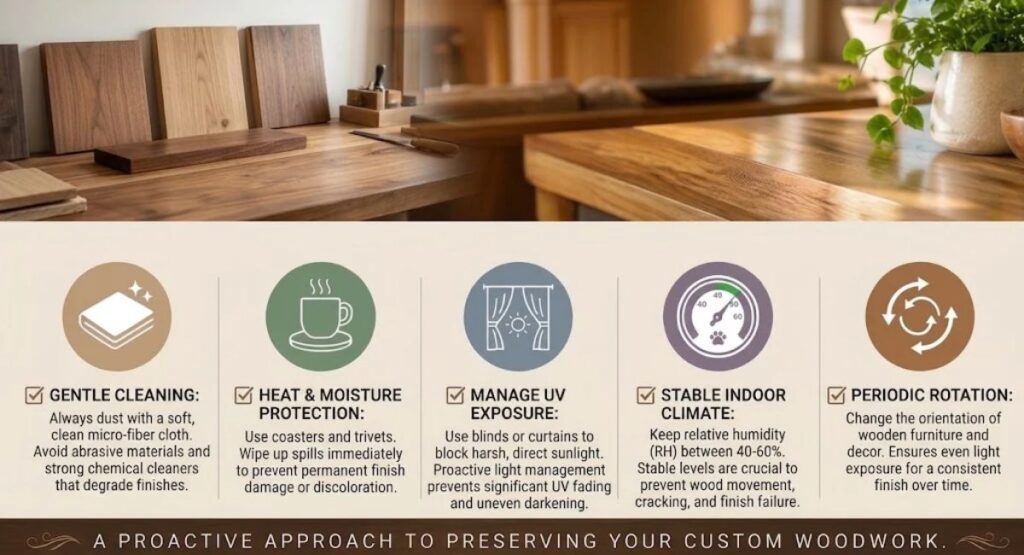
Care cannot stop color change. It can keep it even, slow and attractive. Good habits also protect the finish, which protects the wood.
- Clean gently. Use a soft, damp cloth and a mild soap. Dry the surface right away.
- Skip harsh products. Avoid ammonia, bleach and abrasive pads. Avoid silicone sprays, since they can make repairs and refinishing harder.
- Wipe spills fast. Water and oils can mark the finish and the wood below.
- Use coasters and trivets. Heat and moisture leave rings and haze.
- Control light. Use blinds, curtains or UV-filtering film in sunny rooms.
- Move objects. Rotate decor on shelves and counters so light reaches the surface evenly.
- Keep humidity steady. A comfortable indoor range, often around 35 to 55 percent, helps wood stay stable.
- Follow the maker’s care plan. Oil finishes may need a maintenance coat from time to time. Film finishes usually need only cleaning.
If the finish wears or marks, ask the maker before you try a home fix. A small touch-up is often easier than a full refinish. Early repair also helps the color stay even.
Matching Old and New Wood In A Remodel
New wood beside old wood rarely matches on day one. This is the most common color complaint in remodels.
Say you add a cabinet run to a kitchen with five-year-old cherry. The new cabinets look pale next to the old ones. Over time, the new run darkens and the gap narrows. It may take months or years to get close. Light exposure and species decide the pace.
There are several ways to manage this:
Order together when you can. Doors and panels cut from the same lot of lumber and finished together will age more alike.
Plan for spares. Order an extra door or panel for repairs at the time of install. A later replacement made from a different lot may look different.
Ask about toning. A finisher can add pigment or toner to match an aged surface. This can come close but may not match perfectly in all lights.
Consider refinishing the whole run. For a visible mismatch, refinishing nearby pieces can unify the color.
Set expectations. Ask the maker how much difference to expect and for how long. A clear answer builds trust and avoids surprises.
If you plan to match or extend woodwork, bring a door, a drawer front or a sample so the maker can see the current color.
Why Wood Changes Color: Frequently Asked Questions
Why does wood change color over time?
Light and oxygen react with lignin and natural extractives in the wood. The finish also ages. Heat, moisture and metal contact can add to the change.
Why does white oak darken over time?
White oak holds tannins and other extractives. These oxidize with light and air, which warms the wood from pale tan toward golden or amber brown.
Does walnut get lighter or darker?
Black walnut often lightens with strong light, shifting from deep purple-brown toward a lighter golden or gray-brown. Shade slows the change.
Does cherry always darken?
Cherry usually darkens to a deeper red-brown. Light speeds the process. Most of the change often comes in the first year.
Can you stop wood from changing color?
No finish can promise to stop all change. UV-absorbing finishes, window treatments and good habits can slow it.
Which finish keeps wood lightest?
Water-based clear coats usually keep wood lighter and clearer than oil-based coatings. The wood under the finish still changes with light.
Does sanding bring back the original color?
Sanding removes the changed surface layer and exposes fresh wood. The new surface starts to age again. On veneer, sanding depth is limited.
How long does wood take to settle?
Most visible change happens in the first weeks to months. Many woods settle into a steadier tone after a year or two. Slow shifts can continue beyond that.
Plan For The Patina, Not Against It
Wood changes color because it is natural. Light, air, moisture and the finish all play a part. White oak and cherry tend to darken. Walnut often lightens. Maple tends to warm gently. No finish stops every shift, but the right finish, sample testing and simple care make change predictable.
Start with samples. Ask to see aged boards. Run a split-sample test in your own light. Match the finish to the species and the room. Plan for spares and for matching if you will add to the work later.
Ready to plan woodwork that ages well? Rines Design builds custom wood work for kitchens, built-ins, bars and more, and can walk you through species and finish options with real samples. As a custom woodworking shop, we plan color, finish and care with you before production starts. Contact Rines Design to talk through your project.