Making custom wood signs is a fun and rewarding craft that can be enjoyed by beginners and experienced woodworkers alike. With the right tools, materials, and techniques, you can create beautiful and unique custom wood signs for your home, or business, or as gifts for family and friends. In this article, we will walk you through the steps of making custom wood signs.
Table of Contents
How to make custom wood signs
Before you jump into making a custom wood sign, you need to learn exactly how to do it, and what materials you would need. Using the right materials is essential to attaining a quality product of which you can be proud. So let’s break it down:
Materials and Tools Required
To make an eye-catching custom wood sign, you will need the following materials and tools:
Materials:
- Wood board (such as pine or cedar)
- Sandpaper
- Stain or paint
- Vinyl lettering or stencils
- Clear coat (optional)
Tools:
- Jigsaw or circular saw
- Drill
- Sandpaper block or electric sander
- Paintbrush or foam roller
- Vinyl cutter or stencil cutter (optional)
- Paint scraper or putty knife (optional)
- Step 1:
Choose Your Wood Board: The first step in making a custom wood sign is to choose the right wood board. You can find wood boards at most home improvement or hardware stores. Pine and cedar are popular choices because they are affordable, easy to work with and have a beautiful grain pattern.
- Step 2:
Cut Your Wood Board to Size: Using a jigsaw or circular saw, cut your wood board to the desired size and shape. You can choose a rectangular, square, or circular shape, depending on your preference. Be sure to sand the edges of your wood board to remove any rough spots.
- Step 3:
Sand Your Wood Board: Use a sandpaper block or electric sander to sand your wooden board. Start with coarse-grit sandpaper (such as 80-grit) and gradually move to finer-grit sandpaper (such as 120-grit). Sanding your wood board will help to remove any rough spots and prepare the surface for staining or painting.
- Step 4:
Stain or Paint Your Wood Board: Now it’s time to stain or paint your wood board. Choose a stain or paint color that complements the decor of the room where your sign will be displayed. Use a paintbrush or foam roller to apply the stain or paint evenly across the surface of your wood board. Allow the paint to dry completely.
- Step 5:
Apply Vinyl Lettering or Design Stencils: Once your wood board is dry, it’s time to apply your vinyl lettering or design stencils. To apply your vinyl lettering or stencils, first, clean the surface of your wood board with a damp cloth. Then, carefully position your vinyl lettering or design stencils on your wood board. Use a credit card or scraper to smooth out any bubbles or wrinkles in the vinyl or stencil.
- Step 6:
Paint Your Letters or Designs: Once your vinyl lettering or designs are in place, it’s time to paint it. Choose your paint colors and brushes, and begin painting your design onto the wood. Be sure to use a steady hand and take your time to avoid mistakes. If you make a mistake, you can use a damp cloth to wipe off the paint before it dries.
If you prefer, you can also use paint pens to add detail or to touch up any areas that need it. Paint pens can be especially helpful for adding small details like lettering or intricate designs.
- Step 7:
Remove the Vinyl or Stencils: After your paint has dried, carefully remove the vinyl or stencils from your wood board. Use a paint scraper or putty knife to gently lift the edges of the vinyl or stencil and peel it away from the wood board. Be careful not to damage your painted letters or stencils as you remove the vinyl or stencil.
- Step 8:
Add a Clear Coat (optional): Once you have finished painting your design, you may want to add a clear coat to protect it. Choose a clear coat that is appropriate for your type of paint, and apply it to the wood with a brush or spray can.
- Step 9:
Hang or Display Your Sign: After your clear coat has dried, your custom wood sign is ready to be hung or displayed. Choose a spot that will showcase your sign and enjoy the personalized touch that it adds to your space.
What is the best wood to use for a sign?
When making custom wood signs near Meridian Hills, IN, choosing the right type of wood is important. The type of wood you use will affect the appearance, durability, and overall quality of the sign. In this guide, we will go through some of the best types of wood to use for a sign.
Cedar
Cedar is a popular choice for outdoor signs because of its durability and resistance to rot and decay. It also has a distinct and attractive grain pattern that adds character to the sign. Cedar is easy to work with and takes stains and paint well.
Redwood
Redwood is another good choice for outdoor signs because it is naturally resistant to moisture and insects. It is also a stable wood that is less likely to warp or twist over time. Redwood has a distinctive reddish color that can add a warm tone to the sign.
Oak
Oak is a strong and durable wood that is commonly used for furniture and flooring. It has a distinct grain pattern that adds character to the sign. Oak is also easy to work with and takes stains and paint well.
Pine
Pine is a popular choice for indoor signs because it is affordable and easy to work with. It is a softer wood that may dent or scratch more easily than some of the other woods on this list. Pine has a lighter color and a straight grain pattern that can provide a clean and classic look to the sign.
Maple
Maple is a strong and durable wood that has a fine, even grain pattern. It is commonly used for furniture and flooring and is known for its ability to stain and paint well. Maple has a light color that can provide a clean and modern look to the sign.
Cherry
Cherry is a hardwood that is known for its rich color and distinctive grain pattern. It is a strong and durable wood that is commonly used for furniture and cabinetry. Cherry takes stain and paint well and can provide a warm and elegant look to the sign.
Mahogany
Mahogany is a hardwood that is known for its deep, rich color and fine, even grain pattern. It is a strong and durable wood that is commonly used for high-end furniture and cabinetry. Mahogany takes stain and paint well and can provide a luxurious and sophisticated look to the sign.
When choosing the right type of wood for custom wood signs near Meridian Hills, IN, it is important to consider the intended use of the sign and the environment in which it will be displayed. Outdoor signs will need to be made from wood that is weather-resistant and can withstand the elements. Indoor signs can be made from a wider range of woods, depending on the desired appearance and budget.
Additionally, you also must consider the thickness of the wood. Thicker wood will provide more stability and durability to the sign, but it will also be heavier and more expensive. Thinner wood may be more affordable and lightweight, but it may not be as sturdy or long-lasting.
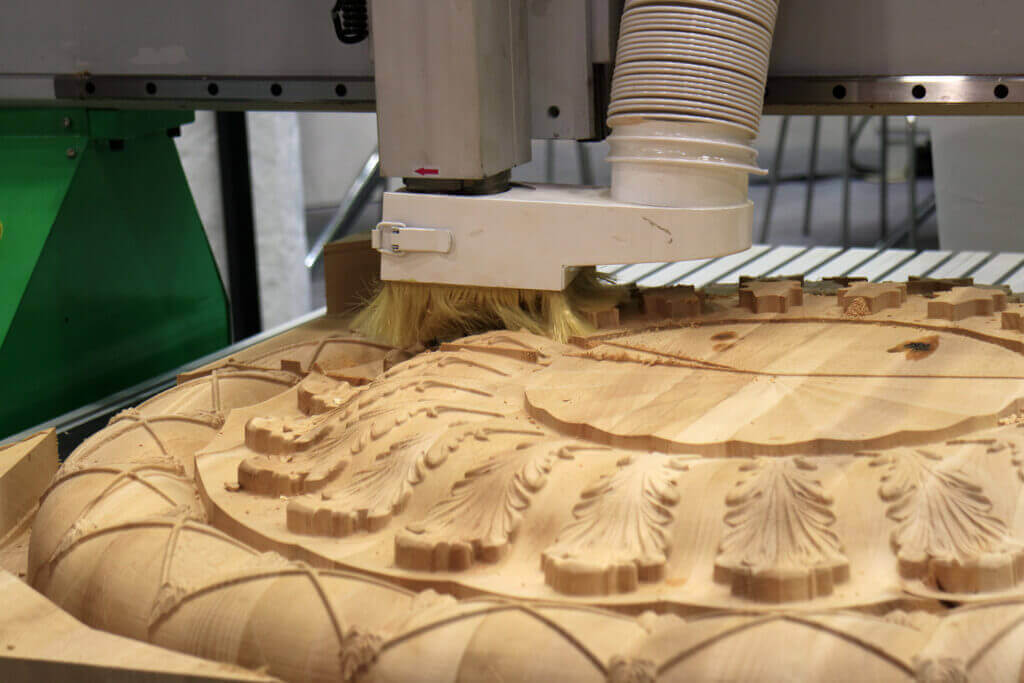
What is the best wood for CNC signs?
When it comes to cnc wood signs, the type of wood used can have a big impact on the final product. CNC (computer numerical control) machines can create intricate designs and precise cuts, but they require a material that can withstand the cutting process without breaking or splintering. In this guide, we will explore some of the best types of wood for CNC signs.
Medium-Density Fiberboard (MDF)
MDF is a popular choice for CNC wood signs because it is affordable, easy to work with, and has a smooth surface that is ideal for detailed cuts. It is made from wood fibers that are combined with resin and compressed under high pressure. MDF has a consistent density throughout the board, which makes it easy to cut and carve. It is also less likely to splinter or break than other types of wood.
Plywood
Plywood is another popular choice for CNC signs because it is affordable and readily available. It is made from thin layers of wood that are glued together in alternating directions, which gives it strength and stability. Plywood can be made from a variety of wood species, including birch, oak, and maple. It is also available in different grades, ranging from A to D, which indicates the quality of the wood veneer.
Hardwoods
Hardwoods such as oak, maple, and cherry can also be used for CNC signs. These woods are more expensive than MDF or plywood, but they offer a unique look and can be stained or finished to enhance their natural beauty. Hardwoods are generally more difficult to work with than MDF or plywood because they are denser and may splinter or break during cutting.
Basswood
Basswood is a softer wood that is ideal for intricate CNC designs. It is easy to cut and carve, and it has a smooth surface that is ideal for detailed work. Basswood is also affordable and readily available, which makes it a popular choice for hobbyists and small businesses.
When choosing the best wood for a CNC sign, it is important to consider the design, size, and intended use of the sign. MDF and plywood are good choices for small to medium-sized signs that require precise cuts and detailed designs. Hardwoods are better suited for larger signs or signs that require a unique look or finish. Basswood is ideal for small signs or intricate designs that require a soft wood that is easy to cut and carve.
Should you hire professional custom wood sign makers?
Whether or not to hire a professional cnc wood signs maker ultimately depends on your skills and experience with woodworking, the complexity of the project, and your desired outcome. Some reasons why you should opt for professional service are:
- Expertise and Experience: Professional sign makers have the skills, experience, and tools necessary to create high-quality and durable signs that meet your specifications. They have a deep understanding of the different types of wood, finishes, and techniques that are best suited for various projects.
- Time Savings: Creating custom wood signs can be a time-consuming process, especially if you are new to woodworking or do not have access to the right tools and equipment. A professional sign maker can save you time by handling all aspects of the project, from design to completion. This allows you to focus on other aspects of your business or project.
- Customization: Professional sign makers can create a sign that is completely customized to your specifications, including size, shape, and design. They can also incorporate unique features such as lighting, engraving, or carving to make your sign stand out.
- Quality Assurance: Professional sign makers are committed to producing high-quality work that meets or exceeds your expectations. They use only the best materials and employ proven techniques to ensure that your sign is durable, weather-resistant, and visually appealing.
Creating or having a custom wood sign can be a cool experience and is a great gifting idea. It is something personalized that anyone can cherish for a long time. While there always is the option to create one on your own, if you lack the expertise or are just not in the mood to experiment, you can easily hire professional help.
We at Rines design are known for detailed and flawless woodwork designs. Our experts can create any type of wood sign, no matter how complex it is.
For all your custom wood signs need, call us today!

Related Articles
If you want to create a visually pleasing sign that attracts the attention of your clients, then you must opt for...
In today's fast-paced world, the fusion of technology and artistry has become integral to various industries. The world of CNC carving...
Efficient space utilization is an ongoing challenge in interior design and home organization. This challenge has led to the rising popularity...
If you want a custom-made coffee bar installed in your home, first, you should hire experts who can understand your requirements...
CNC stands for Computer Numerical Control, and it regulates all devices with moving parts associated with electronic systems. Here is everything...
You want your home to be dazzling, neat, and beautiful, but the messy closet or the little rack in the corner...
To add a personal touch to your bathroom, you need bathroom vanities with tops that add to the overall style and...
Custom closet design options might cost more than premade closets, though, which makes getting them built and installed a matter of...
Making custom wood signs is a fun and rewarding craft that can be enjoyed by beginners and experienced woodworkers alike. With...
The most profitable home improvement projects are kitchen cabinets and other popular improvement choices that will yield a fantastic return on...